We welcome contributions to the Golden Lab Data Science Handbook! If you have suggestions for improvements, additional content, or corrections, please feel free to submit a pull request or open an issue on our GitHub repository.
How to Contribute
This site is built using Quarto, which is a powerful publishing and technical writing tool that allows us to create a static website from markdown files that can easily integrate prose, code, and visualizations. If you want to contribute, you will primarily be doing so by editing the markdown files in the repository.
Getting Started
There are two ways to contribute to this documentation:
Directly on GitHub: You can edit the markdown files directly on GitHub by navigating to the file you want to edit and clicking the pencil icon. This is a quick and easy way to make small changes or corrections.
Locally in Your Own Environment: For larger contributions, you may want to clone the repository to your local environment, make your changes, and then push them back to GitHub. This allows you to test your changes locally before submitting a pull request.
Editing on GitHub is straightforward. Simply navigate to the file you want to edit, click the pencil icon, make your changes, and then commit them directly to the repository. This method is ideal for small edits, such as fixing typos or updating links. However, even for small contributions, it’s best to provide a clear paper trail for what you changed and why, and so we require that all contributions — even small ones — be made through GitHub Issues and Pull Requests1. If this is your first time contributing to an open-source project, this as great low-stakes opportunity to try out this workflow!
Navigate to GitHub. In your browser of choice, go to the GitHub repository: GoldenPlanetaryHealthLab.github.io
Find “Issues”: Click the Issues tab second from the left.
Open an Issue: Click the green “New Issue” button on the right.
Pick the Documentation Template: Click “🧪 New Data Science Tutorial or Documentation”
Fill Out the Template: A template will appear for you to fill out. Please provide a clear title and description of your contribution, however small, and any relevant links or references. For irrelevant fields, simply write “N/A”.
Assign Yourself: Assign yourself to the issue using the “Assignees” section on the right. This is what will enable us to award your contribution to you in the
all-contributorstable and give you credit for your work.Edit the File: Navigate to the file you want to edit, click the pencil icon, and make your proposed changes using markdown, Quarto features, and/or code chunks as needed. You can preview your changes using the “Preview changes” tab to make sure everything looks good.
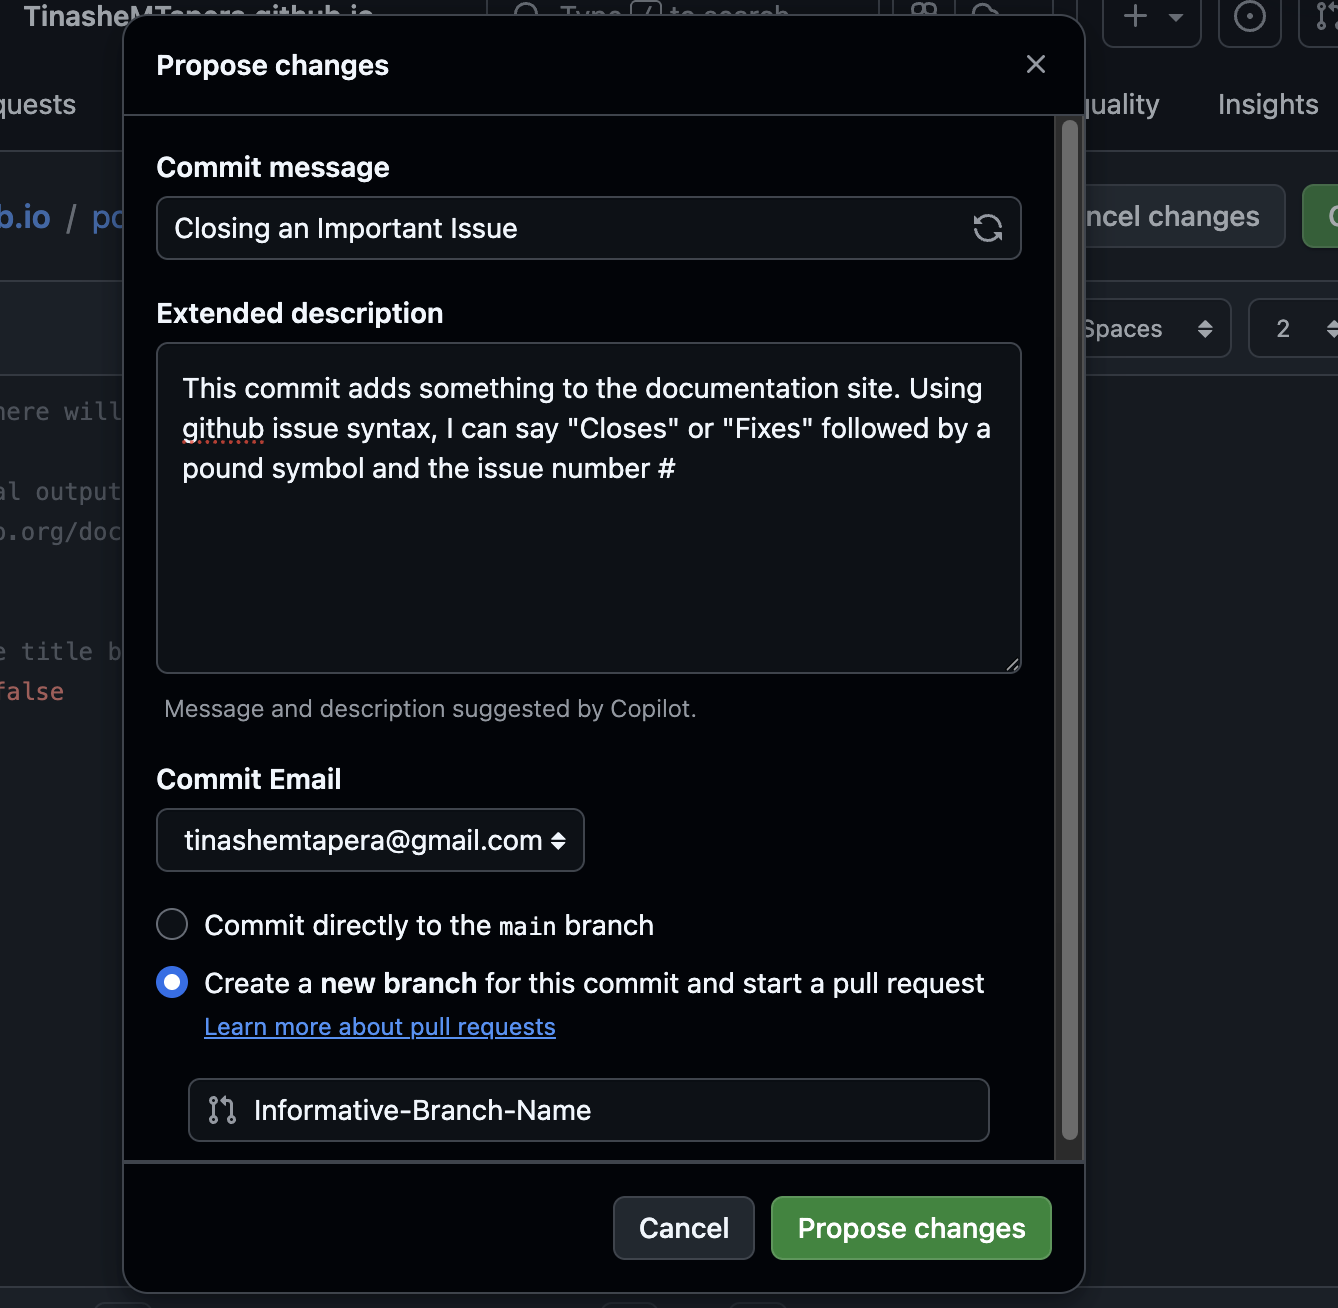
Commit Your Work: Commit your changes using the dialogue box to the repository. In the commit message, please use the GitHub Issues linking syntax to reference the issue number (e.g., “Fixes #123”) to link your changes to the issue you created. Importantly, make sure to select the option to commit your changes to a new branch and create a pull request. This will automatically open a pull request for your changes, which will be reviewed by the maintainers of the repository.
Working locally2 is more involved and requires familiarity with git and the command line. However, this is a useful skill to have and is the standard workflow for contributing to open-source scientific projects. Strap in, and let’s get you set up to contribute like a pro!
Create the Issue on GitHub to Work On: Before you start working on your contribution, it’s important to create an issue on GitHub to track your work. This allows the maintainers to review your proposed changes and provides a clear record of your contribution. Navigate to the GitHub repository, click on the “Issues” tab, and create a new issue using the “🧪 New Data Science Tutorial or Documentation” template.
Set up your local environment for
git: On FASRC,gitcomes pre-installed, but in case you can’t find it, typewhich git. If you get a path back, you’re good to go. If not, load thegitmodule withmodule load git.Set Up Your Local Environment for GitHub: GitHub has a handy CLI tool called
ghthat makes it easy to interact with GitHub from the command line, including creating issues, making Pull Requests, and managing your authentication. To installghon FASRC, see the instructions here #TODO, and return to this tutorial.
You might be aware that FASRC also has some guidance on working with GitHub here. Frankly, their instructions are a bit dated and their recommendations are less user friendly than just using the gh CLI tool, so we recommend following the instructions above instead of those on FASRC’s website.
- Clone the Repository: Find an appropriate directory to work in (since this repository will likely have many individuals contributing to it and very little data or computation, it’s safe to do in your home directory) and run
gh clonecommand to clone the repository to your local environment:
gh repo clone GoldenPlanetaryHealthLab/GoldenPlanetaryHealthLab.github.io
# activate the environment for the repository if applicable

# source .venv/bin/activate # if you have a virtual environment set up for this repository- Create a Local Issue Branch: It’s best practice to create a new branch for your changes, so using the
ghCLI tool, create a new branch based on the issue you created in step 1:
gh issue develop [ISSUE NUMBER] --checkoutMake Your Changes: Now that you have your local environment set up and a new branch created, you can make your changes to the markdown files using your preferred text editor or IDE. Be sure to save your and commit your changes frequently, and test them locally if necessary.
Preview Your Changes: If you want to preview your changes locally before submitting a pull request, you can use the
quarto previewcommand. This will start a local server where you can view your changes in a web browser.Create a Pull Request: Once you’re happy with your changes, you can create a pull request using the
ghCLI tool:
gh pr create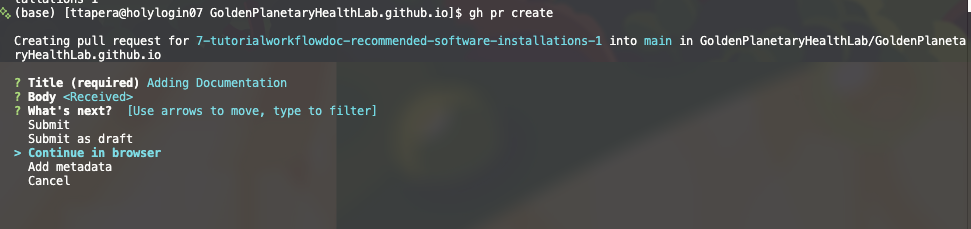
Closing the Issue and Submitting a Pull Request
To complete the process, review the Pull Request, adding relevant information to the Pull Request description, and then submit it for review. The maintainers will review your changes and may provide feedback or request changes before merging your contribution into the main branch.
Quarto is a scientific and technical publishing system built on top of Pandoc, and driven by Markdown. Quarto Markdown files (.qmd) can contain prose, code, and visualizations, and are incrementally rendered into a static website by first evaluating the YAML front matter, running code chunks, and then rendering the markdown into HTML. All of this is wrapped up in the command quarto render.
To build the website locally, you must of course have Quarto installed on your machine/environment. Once you have Quarto and the repo, run the command quarto preview in the terminal while in the root directory of the repository, and Quarto will run quarto render and start a local server where you can view the website in your browser.
On GitHub, we have set up a GitHub Action that automatically runs quarto render and deploys the website’s HTML files to GitHub Pages whenever a commit is added to the main branch. This is why we enforce that all contributions go through GitHub Issues and Pull Requests, even small ones: it ensures that there is a clear record of what changed and why, and allows us to review changes before they are merged and deployed to the live website.
So the next time you want to add new information to the site, and feel like learning something about CI/CD, take a closer look at the GitHub Action that runs on this repository in .github/workflows/publish.yml, and the accompanying set up in the Repo Settings to learn how this process works! You might even want to set up a similar workflow for your own project or personal website.
all-contributors Specification (Advanced Users Only)
We use the all-contributors specification to recognize and celebrate the contributions of everyone who has helped with this project. This includes not only code contributions but also documentation, design, and other forms of support e.g. feedback, issue submission and conversation, etc.
You can automate the process of adding contributors by using the all-contributors CLI tool. On Mac, install npm first:
brew install npm nodeThen, use the following command to add a contributor:
npm install all-contributors-cliThe project is already initialized with all-contributors, so you can start adding contributors right away. You can add contributors from the command line. For example, to add a contributor with the username octocat who has contributed code and documentation, you would run:
npx all-contributors add octocat code,docAnd then create the contribution table with:
npx all-contributors generateThis will update the README.md file with the new contributor and their contributions. Commit and push this file to GitHub to see the changes reflected in the repository’s README.
Footnotes
This is a common practice in open-source projects to ensure that all contributions are reviewed and documented properly. And, to your benefit, if you make changes using
gityour contributions will be automatically tracked and attributed to you, which is important for recognizing your work and giving you credit for your contributions.↩︎While we use the word, “locally,” here, what we really mean is, “not on GitHub or on the cloud.” Locally can refer to your personal computer, or FASRC (which is what we expect you to use). The key point is that, “locally,” means, “you are directly interfacing with the machine where you will be making the edits.”↩︎